How to use AWS CLI like a Pro
Master the AWS CLI auto-complete feature. Discover how to escape the documentation loop and build complex AWS commands interactively right from your terminal.
The AWS Command Line Interface is an absolute powerhouse, but it is also a relentless test of human memory.
With hundreds of services, thousands of underlying commands, and an endless labyrinth of required parameters, flags, and JSON payloads, working in the CLI can feel incredibly daunting.
No engineer genuinely memorizes the exact syntax to configure a CloudFront distribution or filter EC2 instances by state without second-guessing themselves. Instead, the standard workflow usually involves spending half the day bouncing between the terminal and a browser window, endlessly digging through official AWS documentation just to avoid a dreaded aws: error: the following arguments are required message.
It is exhausting, and it completely breaks your flow. But what if you didn't have to leave your terminal at all?
Enable Auto-Prompt
First, make sure you are using AWS CLI version 2. You can check this by running aws --version.*
The AWS CLI auto-prompt feature is a built-in interactive tool (available in AWS CLI version 2) that helps you build commands, find the right parameters, and view documentation directly in your terminal without needing to constantly check the AWS documentation in a browser.
To enable auto-prompt you have three different methods. What method to use depends on whether you want to use it for a single command or have it on all the time.
Method #1: Enable auto-complete for a single command (The easiest way to try it)
Simply append the --cli-auto-prompt flag to any AWS command.
aws ec2 --cli-auto-prompt
You will get an interactive CLI like this.

Use the up/down arrow keys to select a command and run.
Method #2: Enable auto-complete permanently
If you want the auto-prompt to appear every time you run the AWS CLI, you can set it in your configuration.
aws configure set cli_auto_prompt on
This will present you the above interactive shell, for every aws command, even if you type in the complete command correctly. But, that's not exactly the best method. We don't want to see the interactive shell, if we know the command already.
To turn this off later, run aws configure set cli_auto_prompt off.
Method #3: Enable auto-complete partially (Recommended)
This is how many DevOps engineers use it.
aws configure set cli_auto_prompt on-partial
If you use on-partial, the auto-prompt will only trigger if you make a mistake, leave out a required parameter, or run an incomplete command. If your command is perfect, it just runs normally.
How to Navigate the Auto-Prompt Interface
Alright. Now that you have enabled auto-complete, let's see how to use it.
Once the auto-prompt is triggered, the terminal transforms into an interactive panel. Here is how we use it:
- Typing to Filter: Start typing to filter the list of available services, operations, or parameters.
- Arrow Keys (Up/Down): Move through the list of available options.
- Spacebar: If a parameter accepts multiple values (like a list of tags), use the spacebar to select multiple items.
- Enter: Select a highlighted service, operation, or parameter.
- F1 - Toggle Shortcuts: Shows or hides the shortcut menu at the bottom of the screen.
- F3 - Documentation: Press
F3to toggle the documentation panel on or off. This panel shows the official AWS docs for the specific parameter or command you currently have highlighted. - F5 - Show/Hide output: Shows the output format and parameters of the current command.
- F2 - Switch focus to next panel: When you press F3 you will have the AWS documentation opened in a new panel. Press
F2to switch focus between panels. - Enter - Run: Once you have built your complete command, press
Enterto execute it. - CTRL+C - Exit: If you want to cancel and exit without running the command, press
CTRL+C.
Example Workflow
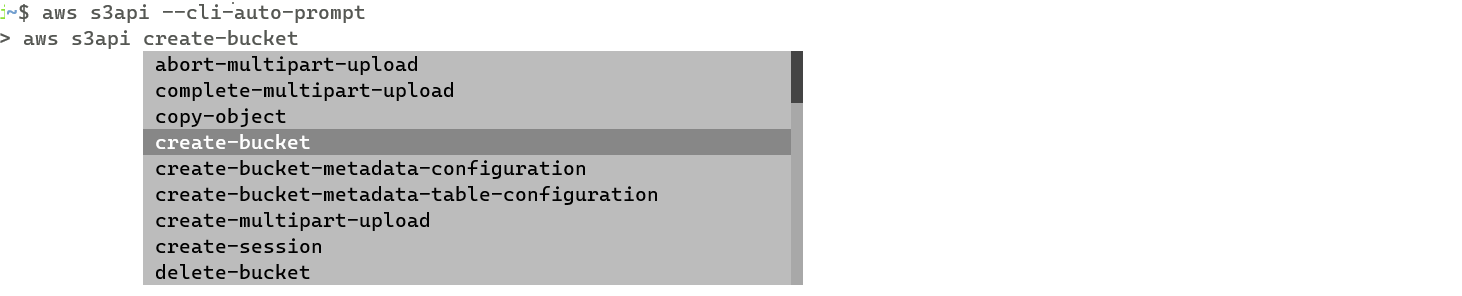
Step-1: Type aws s3api --cli-auto-prompt.
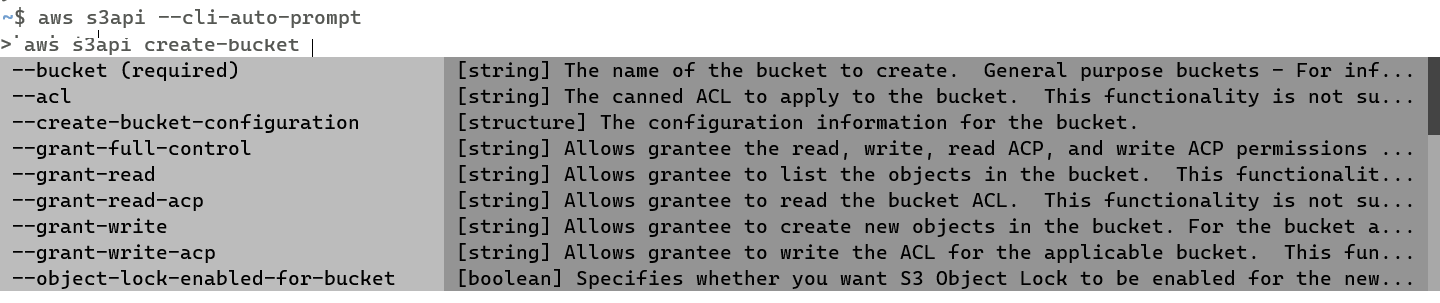
Step-2: The prompt will list all available actions for s3api. Type "create-" to filter the options, and use the arrow keys to highlight create-bucket, then press Enter.
Step-3: Press Space to see the next set of parameters. select --bucket and type a unique name.

Step-4: Press Space and select --create-bucket-configuration. Press Space again and select LocationConstraint= and type in your preferred region. Once you have the complete command press Enter.
$ aws s3api --profile cloudqubes-admin
> aws s3api --profile cloudqubes-admin create-bucket --bucket cloudqubes-100 --create-bucket-configuration LocationConstraint=us-east-2
{
    "Location": "http://cloudqubes-100.s3.amazonaws.com/",
    "BucketArn": "arn:aws:s3:::cloudqubes-100"
}
Try running several other commands like list-buckets, copy-object, etc.
Checking history commands
OK. Now you have run several commands smartly with auto-complete. You want to check the history. You type history and the terminal returns none of the aws commands you executed.
You aren't going crazy—this is actually the expected behavior, though it can be incredibly frustrating if you rely on your Ctrl+R reverse search!
Here is why it happens and the best ways to work around it.
Why Auto-Prompt Commands Bypass History
Your shell history (like .bash_history or .zsh_history) only records text that is typed directly into the standard command prompt and executed by pressing Enter.
The AWS CLI auto-prompt operates as its own interactive terminal application. When you press F4 to execute a command, the AWS CLI runs the command internally using system calls. Because the command is never actually passed back to your shell's input line, your shell has no idea it was run, and therefore cannot save it to your history.
How to Work Around This
While your shell might not track the command, the AWS CLI has its own built-in history feature that tracks every command it executes (including those from auto-prompt). However, it is turned off by default.
1. Enable AWS CLI history:
aws configure set cli_history enabled
2. View your past commands:
aws history list
This will output a table of your recent AWS CLI runs, including the exact command, the time it was run, and an ID.
3. Run command from history:
Unfortunately, the AWS CLI does not have a built in feature to run a command from history, referring the command ID. To run any command from history, you must manually copy-paste the command text.
4. (Optioanl) See the details of a specific run:
If you want to see exactly what parameters were passed or what the API response was, you can inspect a specific command using its ID from the list above:
aws history show <command-id>
Here's how it looks like for an actual command.
$ aws history show 90dec27b-060e-4325-b7d6-416e970c8066

AWS CLI command entered
at time: 2026-05-11 10:30:15.473
with AWS CLI version: aws-cli/2.34.45 Python/3.14.4 Linux/5.15.167.4-microsoft-standard-WSL2 exe/x86_64.ubuntu.22
with arguments: ['ec2']

AWS CLI command entered
at time: 2026-05-11 10:30:48.954
with AWS CLI version: aws-cli/2.34.45 Python/3.14.4 Linux/5.15.167.4-microsoft-standard-WSL2 exe/x86_64.ubuntu.22
with arguments: ['ec2', 'describe-instances']

AWS CLI command exited
at time: 2026-05-11 10:30:53.380
with return code: 253
Wrapping Up: The Golden Rule of the AWS CLI
The AWS CLI is an incredibly powerful tool—especially when you unlock features like auto-prompt. So it is crucial to draw a hard line on where and how it should be used.
The golden rule: Do not use the AWS CLI to manually modify or provision resources in production.
It is tempting to run a quick aws ec2 run-instances or tweak a security group via the command line to solve an immediate problem. However, making ad-hoc, imperative changes bypasses your state files, destroys version control, and introduces configuration drift. For creating, updating, or deleting production infrastructure, always leave the heavy lifting to Infrastructure as Code tools like Terraform or OpenTofu.
So, where does the AWS CLI truly shine?
Think of it as your ultimate read-only superpower. The CLI should be your go-to companion for:
- Auditing and Discovery: Quickly listing resources, checking IAM permissions, or finding orphaned EBS volumes.
- Troubleshooting: Tail-ing logs, checking the state of a failing deployment, or verifying network configurations.
- Local Scripting and Development: Prototyping workflows in a sandbox account or writing local automation scripts that fetch data.
Mastering the AWS CLI isn't about using it to build your entire infrastructure; it's about navigating, querying, and understanding the infrastructure you've already built.

Indika Kodagoda
Indika Kodagoda is a Lead DevOps Engineer, AWS certification instructor, and the creator of CloudQubes. He specializes in cloud infrastructure, automation, and modern Ruby on Rails development. When he’s not deploying code or mentoring aspiring engineers, he’s usually enjoying nature and cycling local gravel paths.